
Video walkthrough
Overview
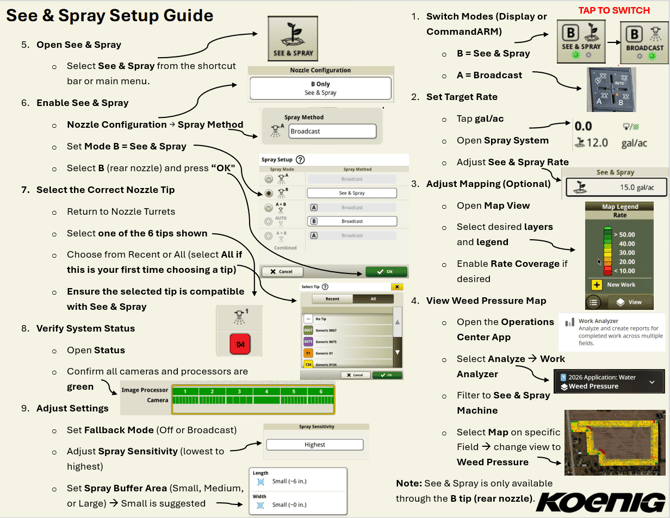
See & Spray uses onboard cameras and image processors to detect weeds in the field and spray only where they are found, reducing chemical use while protecting your crop. This guide walks through how to turn See & Spray on, choose the correct nozzle tip, confirm the cameras are ready, adjust sensitivity and buffer settings, and review your results in the Operations Center. If you would rather follow written steps instead of the video, the quick-reference steps below cover the full process.
Before you begin- Make sure your display is powered on and running.
- Confirm your sprayer is equipped for See & Spray (cameras and image processors installed across the boom).
- Note that See & Spray is only available through the B tip, which is the rear nozzle. You cannot run See & Spray from the A (front) nozzle.
- Keep your nozzle tip part number handy so you can select the correct tip during setup.
From the shortcut bar at the bottom of your display, select See & Spray. You can also open it through the Menu button and find the See & Spray app there. Once inside, you will see sections for Status, Nozzle Configuration, and Control and Settings.
2. Switch the spray method to See & Spray- Select Nozzle Configuration to open the Nozzle Turrets page.
- Locate Spray Method on the left-center of the screen.
- Under Spray Mode, find nozzle B and change it from Broadcast to See & Spray.
- Select the B option and press OK.
This configures the sprayer to run See & Spray through the B (rear) tip. Remember: See & Spray works only on the B tip.
3. Select the correct nozzle tip- After pressing OK, you return to the Nozzle Turrets page. Select one of the six nozzle tips to update it.
- On the Select Tip page, choose from a Recent list or the All list. If this is your first time selecting a tip, choose All to view every available option.
- Make sure the tip you choose is compatible with See & Spray.
If a tip is not supported, a notification will appear reading "tip unsupported by See & Spray," and the system will automatically switch back to Broadcast-only mode. Selecting the correct tip ensures the system operates as intended.
4. Verify system status- Return to the See & Spray menu and select Status.
- Confirm that all cameras and image processors show green.
Status displays each image processor and camera across the entire boom. Scroll through individual processors using the arrow controls. All should be green when everything is working properly.
5. Adjust your settingsOpen the Control and Settings section. Here you can adjust:
- Fallback mode: Determines how the sprayer responds if an issue occurs. Options are Off (no spraying) or Broadcast (continuous spraying). Broadcast is generally the preferred option.
- Spray sensitivity: Controls how aggressively the system detects weeds on a scale from 1 to 5. Lowest targets larger weeds; Highest targets smaller weeds.
- Spray buffer area: Adjusts the length and width of the sprayed area around a detected plant. Both width and length can be set to Small, Medium, or Large. Small is typically recommended because it allows speeds up to 15 mph.
A common misconception is that the target rate can be adjusted from the spraying menu in the top-left corner. Rates 1, 2, and 3 are tied to ExactApply, not See & Spray.
To set the See & Spray target rate:
- From the home page shortcut, select the gallons-per-acre (gal/ac) selection to the right of the target rate.
- This opens the Spray System menu, where you can adjust the See & Spray target rate.
You can switch modes quickly from the CommandARM:
- Press A for Broadcast only.
- Press B for See & Spray.
From the home screen, the nozzle control shows B and See & Spray is activated on the toolbar. You can also return to the toolbar, switch to Broadcast, and turn See & Spray off through the See & Spray activity app.
8. Review mapping (optional)- Select Map View.
- Make sure the legend and layers are set to your preference. For example, you can display As-Applied Rate, which shows clearly what was sprayed versus what was not.
After you finish spraying, you can review a weed pressure map in the Operations Center:
- Open the Operations Center app.
- Select Analyze, then Work Analyzer.
- Filter to your See & Spray machine.
- Select a specific field and change the view to Weed Pressure.
The weed pressure map shows weed concentration and density. Areas with a lot of weeds appear as red spots; areas with few or no weeds show green. A mostly green map indicates a lower concentration of weeds, while more red and yellow indicates a higher concentration.
Helpful tips- Always confirm all image processors and cameras are green in the Status menu before you start spraying.
- Use the diagnostic camera view to dial in spray sensitivity. In the Status section, select a specific image processor, then select Camera Feed. Blue shows detected targets being sprayed, green shows identified crop, and no color means no crop or weeds detected in that area. Switching between low and high sensitivity lets you see how many smaller weeds the system is catching.
- Remember that See & Spray is available only through the B (rear) tip. If you need Broadcast, switch to the A tip or use the Broadcast method.
- Detail descriptions for each setting may vary slightly depending on the software version of your display.
If you run into a setting that is not working as expected or you want help confirming your See & Spray configuration is ready for the season, reach out to Koenig Equipment. Our team can walk you through the setup and make sure your sprayer is calibrated and field-ready.