
Video walkthrough
Overview
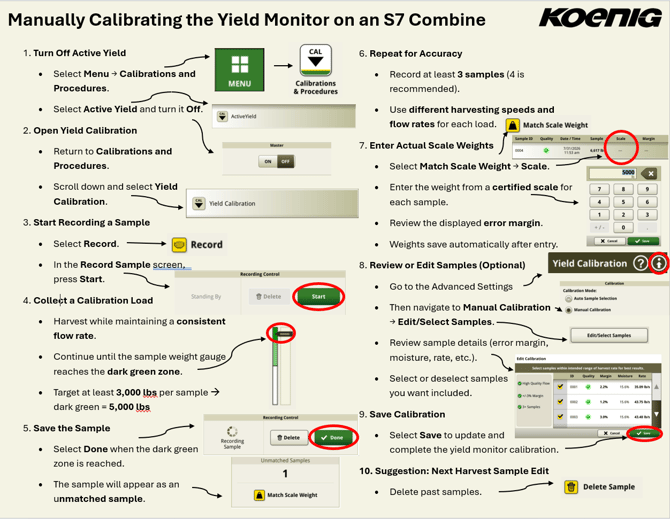
Calibrating your yield monitor helps the combine record accurate yield, moisture, and weight data as you harvest. This guide walks through how to manually calibrate the yield monitor on an S7 combine, including how to collect calibration samples, match them to certified scale weights, and edit or save your calibration. Taking the time to calibrate at the start of harvest gives you reliable data to compare fields and make decisions all season.
Before you begin- Have access to a certified scale for weighing your calibration loads.
- Plan to run calibration loads at varying speeds and flow rates (for example, if you normally run 4 mph, also calibrate at 2, 3, and 5 mph).
- You will need to collect at least 3,000 lbs per sample; the dark green zone on the gauge is 5,000 lbs.
- Aim for at least 3 samples, with 4 recommended for the best accuracy.
- Select Menu, then under Machine Settings open the Calibrations and Procedures app.
- Select Active Yield.
- Turn Active Yield Off.
- Return to the Calibrations and Procedures page.
- Scroll to the bottom and select Yield Calibration.
The calibration page shows a description of the process on the left, which recommends three or more samples to increase accuracy.
3. Record a sample- Select Record (right side of the display, middle of the screen).
- In the Record Sample menu, you will see the inputs measured during calibration: mass flow rate and weight.
- Press Start to begin the calibration process.
- Harvest while maintaining a consistent flow rate.
- Continue until the sample weight gauge reaches the dark green zone.
You need at least 3,000 lbs to collect an adequate sample, and the dark green zone is 5,000 lbs. Run your different calibration loads at varying speeds and flow rates. If you normally run at 4 mph, also calibrate at 2, 3, and 5 mph. Ideally, run the calibration load at least four times.
5. Save the sample- When the gauge reaches the dark green zone, select Done.
- The sample will appear as an unmatched sample.
- Record at least 3 samples (4 is recommended).
- Use different harvesting speeds and flow rates for each load.
- Select Match Scale Weight, then choose the three dots under Scale.
- Enter the actual weight from a certified scale for each sample.
- Review the displayed margin of error.
For the best accuracy, enter the scale weight for each unmatched sample as you unload and receive the certified scale weight. Weights save automatically after entry. Once fully calibrated, the system adjusts the recorded weights to more closely match what you entered and shows a percent error. After calibration, recent errors should all be within plus or minus 3%.
8. Review or edit samples (optional)- In the Yield Calibration menu, go to Advanced Settings.
- Under Calibration Mode, select Manual Calibration.
- Select Edit and Select Samples.
Here you can review the details for each sample, including margin of error, moisture, and rate. You can select specific samples to use or deselect them.
9. Save calibration- Select the samples you want to use.
- Select Save to update and complete the yield monitor calibration.
You will get a notification confirming the calibration was saved.
Helpful tips- Calibrate at the beginning of harvest, and delete past samples from the previous season before starting fresh. In Edit and Select Samples, select a sample and press Delete, then begin a new calibration for the new season.
- Vary your speed and flow rate across samples. Multiple loads at different speeds give the monitor the data it needs to stay accurate across real-world conditions.
- After calibration, check that recent errors are within plus or minus 3%. If one sample is far off, you can deselect it in Edit and Select Samples and save again.
- Use a certified scale for the most accurate scale weights. The closer your entered weights are to actual, the more accurate your yield data will be.
If you want help calibrating your yield monitor at the start of harvest or reviewing your sample accuracy, contact Koenig Equipment. Our team can walk through the calibration process with you and make sure your combine is set up to capture clean, reliable yield data.